

After experimenting with a soil-to-hydro transplant that yielded a surprisingly resinous bloom, I set out to try something new: running the full cycle — from seed to harvest — using only a compact kitchen hydroponic system.
This isn’t a high-end grow setup. No grow tents, no fans, no carbon filters.
Just a basic kit, a lot of curiosity, and the goal of seeing how far I could take it.

This grow is for anyone who wants:
✅ Compact but high-quality results
✅ A grow that fits in small spaces — no indoor build required
✅ A clear, honest look at each stage of hydroponic growing on a minimal budget
📹 Full timelapse video
📦 Materials Used for the Grow
For this project, I worked with just four main elements:
1️⃣ Hydroponic Growing System Kit
There are several small hydroponic kits designed for herbs and vegetables that actually work quite well for cannabis — if you know how to adapt them.
The one I used has 12 planting pods, but I only used the center one and covered the rest with black tape to block light and avoid algae.
I’ve tried several of these kits over time. The most popular brand is AeroGarden, with a huge community on Reddit. Other solid options include LetPot, iDoo, and AhopeGarden.. The one I used is a custom kit I modified myself (similar to the models above).
They come with everything you need:
- A container for the nutrient solution (the mix of water and nutrients where roots will grow).
- An adjustable LED lamp you can raise, lower, dim, and set on a timer.
Thanks to this, you can grow hydroponically in almost any corner of the house.

- Automatic timer makes sure the lights go on and off at exactly the right time, and the digital…


- SMART HYDROPONIC SYSTEM: Upgrade your indoor gardening experience with our patented smart hydroponic…

- 2 Growing Modes: 22-Watt LED light of iDOO hydroponics growing system turns on/off automatically…
I placed the plant in the center and covered the rest with black tape to prevent light from reaching the solution (avoiding algae).

2️⃣ The Best Genetics for This Build
For this grow journal, I used a personal crossbreed specifically bred to stay short and finish fast. Using the wrong genetics in a compact hydroponic system is the #1 mistake growers make—plants can easily outgrow the lights and burn.
Since my personal cross isn’t commercially available, I have selected the 4 strains below that genetically match the structure and speed required for this specific setup. If I were starting this grow today from a seed bank, these are the ones I would choose to guarantee a harvest without height issues.

The “Peace of Mind” Option: Purple Haze Auto
Don’t let the “Haze” name scare you; this auto version keeps the sativa energy but stays compact. It’s the safest bet for beginners because it’s incredibly forgiving with pH fluctuations common in small tanks.
Why it fits: Short internodal spacing meant for indoor growing.
Effect: Creative & Energetic (~20% THC).

The Heavy Hitter: Gorilla Z Auto If you want to maximize the gram-per-watt ratio of your system, this is the one. It’s incredibly sticky. I selected this recommendation because it stays bushy rather than stretching tall, making it perfect for the limited vertical space we have
Why it fits: Dense bud structure that maximizes small yields.
Effect: Intense Relaxation (~28% THC).

The Genetic Father: Z‑Up Auto This strain is actually one of the parents of the cross I used in this guide. It offers the exact same resilience and fast flowering time you see in my photos
Why it fits: Engineered for quick cycles (seed to harvest in record time).
Effect: Balanced Hybrid (~27% THC).

The Classic Choice: AK‑47 Auto A legend for a reason. Low odor (great for stealth grows) and naturally resistant to mold, which is crucial given the high humidity often found in compact hydro systems.
Why it fits: Naturally robust and compact.
Effect: Social & Creative (~20% THC).
3️⃣ Nutrients
Most hydroponic kits include nutrients meant for basil, mint, or lettuce — but cannabis has very different needs, especially in flowering. The kits usually come with vegetative-focused nutrients, lacking the high levels of phosphorus and potassium required for cannabis flowering

In this grow, I used a local brand from Argentina called BioProyect, which unfortunately isn’t available internationally. If I were growing in the U.S., I’d go with General Hydroponics FloraSeries, which has a similar nutrient profile and feeding schedule.
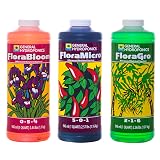
- The Flora Series is a hydroponic-based nutrient system that helps fulfill your plants’ nutrient needs at every stage of growth
4️⃣ EC Meter
Unlike my previous grow, this time I tracked electrical conductivity to get a more precise read on the nutrient levels.
💡 EC (electrical conductivity) measures the amount of dissolved salts in your solution — in other words, how “strong” your nutrient mix is.

I used the BlueLab EC meter (a bit pricey, but incredibly reliable).

- Quickly monitor for precise up and down of your nutrient (TDS) level in solution to maximize your grow and ensure plants get the balanced feed they need; Measures while mixing nutrients in your tank
If you’re on a budget, here are some solid alternatives that still do the job:

- {One-click access to the temperature pH EC value of hydroponic nutrients solution} YINMIK 4-in-1 pH…

- Measures electrical conductivity (EC), total dissolved solids (TDS). Exellent for nutrient testing.
⚠️ Note: This guide uses PPM values. Be sure to check whether your meter reads in PPM or EC to avoid misinterpretation.
Extra Additive: Aptus Regulator
One product I didn’t mention earlier, but which made a real difference in this grow, is Aptus Regulator. It’s a Dutch additive made from silicon, boron, and molybdenum. What it does is strengthen the plant’s cell walls — making the plant more resilient to stress, heat, and pests.
This product isn’t available on Amazon at the time of writing, but you can check it out on the official Aptus website:
👉 [Aptus Regulator official site]
If you’re in the U.S. or can’t access it easily, a good alternative would be a silicon supplement — I’m currently testing a few and will update this section with recommendations soon.

- Made for Plant Strength Support – Formulated with silica to support structural plant development.
🌱 Germination
To germinate the seed, I used a very simple method: a glass of tap water with 4 drops of hydrogen peroxide.


- After 48 hours, the root tip showed.

- By 72 hours, it had reached 2 cm — ready for the hydroponic system..

Steps:
- Cut the sponge lengthwise.

- Insert the seed so the root is “hugged.”

- Place the sponge in the basket, and the basket in the HydroKit.
- Place the humidity dome on top.

- Fill with water (if above 150 ppm, use distilled or AC water).
- Turn on the HydroKit in germination mode (18h, 100% light, lamp at 10–15 cm).

👉 When cotyledons appear (with this process, one or two days), remove the dome.
📖 Basic Concepts Before the Week-by-Week Grow
Before diving into the weekly breakdown, here are some key tips that helped me stay on track and avoid early mistakes:
🔹 Solution Level
- Always keep the water level just below full — usually where the kit marks the “green” optimal zone.
- If PPM drops → it means the plant is eating → add nutrients.
- If PPM rises → water is evaporating faster than nutrient uptake → add plain water.

🔹 How to Mix Nutrients
The nutrient salts don’t dissolve instantly. If you want to get an accurate PPM reading right away, open the lid and mix manually..
🔹 Nutrient Dosage
- Vegetative stage: 3ml total (1ml FloraMicro + 1ml FloraGro + 1ml FloraBloom)
- Bloom stage: 4ml total (1ml FloraMicro + 1ml FloraGro + 2ml FloraBloom)
🔹 Adjusting PPM
Let’s say your target is 400 ppm and you start with 250 ppm:
If you go way over → remove some solution manually (using a small container or syringe).
Add 3ml of nutrients (1 Micro, 1 Gro, 1 Bloom), wait a few minutes, and measure.
If it’s still below 400 → repeat the process gradually.
If it goes over → dilute by adding water.
📆 Week-by-Week Grow Log
| Week | PPM | Light | Key Note |
|---|---|---|---|
| 1 | 200–300 | Germination | No nutrients until day 4 |
| 2 | 300–500 | Vegetative | First adjustments. Add 4 drops of silica |
| 3 | 500–700 | Vegetative | Branches formation and pruning |
| 4 | 600–800 | Vegetative | Recovery Pause |
| 5 | 800–1000 | Veg → Bloom | Nutrient mix switch 1:1:2 Add 4 drops of silica |
| 6 | 800–1000 | Bloom | Pruning + Plant Redesign |
| 7 | 900–1000 | Bloom | Root Cutting |
| 8 | 900–1000 | Bloom | Flower Formation |
| 9 | 1000–1200 | Bloom | Flower Development |
| 10 | 1000–1200 | Bloom | Flower fattening Add 2 drops of silica |
| 11 | 600–800 | Bloom | Maturation and Closing the Cycle |
📆 Week 1 – First Sprouts & First Feeding
🟢 Light mode: Germination mode at 100% intensity.
At this early stage, there’s no need for nutrients — the seed uses its own internal energy to sprout. Once the first true leaf pairs appeared, I gave the first feeding.
- Day 4: First nutrient addition — about 200–300 ppm.
- Light height: Kept the lamp at around 15 cm from the seedling.

📆 Week 2 – Leaf Expansion & First Adjustments
🟢 Light mode: Switched to vegetative mode at 100% intensity.
🌱 Feeding: Adjusted to 300–500 ppm.
The plant “woke up” this week. The small leaves from week 1 stretched out and took on a deeper green. I did notice a few spots on the early leaves — likely from a slightly delayed or weak feeding.
To correct it, I bumped the ppm and inspected the tank for algae or odd bubbles.
Also add 4 drops of silicon, to contribute to the overall health of the plant.
💡 Tip: If you see any pests, this is a good week to apply a light preventive spray.
📆 Week 3 – Branch Formation & Strategic Pruning
🌱 Feeding: 500–700 ppm.
This is where things get exciting — side branches started forming. But it’s also where my first real challenge showed up: some of the lower leaves developed brown spots. This was a clear sign of early nutrient deficiency — probably because I waited a bit too long to start feeding, or the initial dose was too light.
I reacted quickly (as early as Week 2 when the first symptoms appeared) and adjusted the feeding, but a few sets of leaves kept the marks as a reminder. You’ll see those in the timelapse — they don’t affect growth, but they’re worth mentioning to keep this log real. That little sprout suddenly had arms, and the plant began to look more bushy and alive.
I started checking the plant multiple times a day. In this phase, visible changes can happen in less than 12 hours.
✂️ Day 25: Major pruning session.
The large fan leaves were blocking light from reaching the new branches, so I trimmed them to open up space. The plant paused for a couple of days — a normal recovery period as it redirected energy.
🔁 Day 26: Switched light to bloom mode.
📆 Week 4 – Recovery Pause
🌱 Feeding: 600–800 ppm.
The plant’s growth slowed down this week, showing a small pause in its rhythm. Movements became less noticeable —a natural response after the strategic pruning from the previous week. The plant needed time to recover from the stress and redirect its energy toward the younger branches.
Meanwhile, the feeding was raised to 600–800 ppm, ensuring it had everything required to regain momentum. This stage may look quiet in the timelapse, but it’s actually crucial: the plant is reorganizing internally and preparing for the next phase.
📆 Week 5 – Nutrient Shift
🌱 Feeding: 800–1000 ppm.
🥄 Formula: switched to a 1:1:2 ratio (Micro:Gro:Bloom).
After the brief pause in Week 4, the plant regained its normal growth rhythm. Branches stretched, new leaves appeared, and the overall structure began to expand again.
This week marked an important change in the feeding formula, adjusted to a 1:1:2 ratio in preparation for the flowering stage. Although there were still no visible signs of pre-flower, since it’s an autoflower we follow the timing —and that’s why we start providing more phosphorus and potassium, increasing the Bloom proportion.
🧪 Checked the roots — they looked white and healthy, with no off smells.

Also add 4 drops of silicon.
📆 Week 6 – Pruning + Plant Redesign
🌱 Feeding: 900–1000 ppm.
✂️ Day 44: heavy pruning + branch training with wire.
This week was key to shaping the plant’s final structure. I started with a strong pruning, removing the lower leaves so light could reach the inner growth. Then came the structural training using wires.
I made small wire loops and passed them through the holes in the lid of the hydroponic system. From those loops, I extended wires toward the branches, applying gentle but firm pressure. The wire should be thin enough not to damage the plant, but strong enough to stay in place after the intervention.
It’s also possible to use strings, but wires are far more efficient since they can be bent and adjusted easily. The goal was to stretch the plant outward, guiding the branches to spread across the hydroponic system so the light could be used more efficiently.
At first, the plant looked like it had been “abused,” but it quickly adapted and resumed growth with a much more balanced, open structure. This stage really feels like bonsai training, where you guide the plant into the shape you want.
📆 Week 7 – Root Cutting
🌱 Feeding: 900–1000 ppm.
✂️ Day 56: Root pruning — removed 75% of the root mass.
I hesitated quite a bit before making this move. I had been reading about bonsai techniques and root restriction as a method for controlling plant size, and I was starting to worry that the plant might outgrow the space. Back then, ChatGPT didn’t exist (actually it did but it wasn’t as massive as now), and the answers I found online weren’t particularly convincing.
In the end, I decided to try it. The plant was vigorous and I felt it could handle the stress. Still, part of me wonders what would’ve happened if I had left the roots untouched. Yes, it sounds extreme — but this helps stop vertical growth and lock the plant into its final form.
🔁 Day 57: Last preventive spray.
⚠️ Note: I later noticed thrips. I probably should have sprayed more aggressively here.
📆 Week 8 – Flower Formation
🌱 Feeding: 800–900 ppm.
This week marks a milestone in the grow: flowering finally begins. The characteristic white hairs (pistils) start to appear on every tip, signaling the start of the plant’s reproductive stage.
Growth dynamics also shift —after weeks of lateral expansion and structural training, the plant now begins to stretch upward, gaining height while channeling energy into the future buds.
It’s an exciting moment in the timelapse, as the transformation is clearly visible —the plant leaves behind its vegetative phase and fully commits to flower development.
📆 Week 9 – Flower Development
🌸 Feeding: 1000–1200 ppm.
💡 I lowered the light to 7 cm; always test with your hand to make sure it’s not too hot.
This week, the flowers are clearly developing on every tip. We’ve reached the maximum feeding point —around 1000–1200 ppm— a level that will be maintained for several weeks to support bud formation and fattening.
As the days go by, a few large leaves are also removed. The rule of thumb here is simple: if a leaf is blocking light from reaching a developing bud site, it can be taken off. Still, it’s important not to overdo it —at this stage the plant is no longer producing new leaves, so each one you remove has to be worth it. Otherwise, you risk weakening the plant.
📆 Week 10 – Flower Fattening
🌸 Feeding: 1000–1200 ppm.
The flowers kept bulking up visibly, and the aroma became more and more intense. The plant was now fully focused on producing and consolidating the buds, while we maintained feeding at the maximum level of 1000–1200 ppm.
This week also brought a minor thrip infestation. Since the plant was already in late flowering, I chose not to apply strong treatments to avoid damaging the buds. At this stage, pest control becomes tricky —any aggressive intervention can directly affect the final quality of the harvest.
The focus was on close observation and keeping the system stable, ensuring the plant could continue its fattening process without interruptions.
📆 Week 11 – Maturation and Closing the Cycle
🌸 Feeding: 600–800 ppm.
This week, the plant began to show the clear signs of its final stage. Insect activity became more noticeable, especially Parthenothrips dracaenae, a small pest that leaves marks on the leaves. By this point, it was too late to take meaningful action, though luckily the infestation was very minor and didn’t compromise bud development.
🔍 As part of my daily routine, I checked the trichomes with a magnifier. Watching them shift from clear to cloudy, and then to amber tones, was an oddly satisfying process.
In the final days, the plant slowed down: leaves started yellowing, some dried up, and the pistils turned a deep amber color. A light layer of powdery mildew appeared… This is common in compact systems with low airflow. Next time, I will add a small USB fan inside the structure earlier in the grow to prevent this.
If it hadn’t been for that, I might have let the plant run for another week or two. But considering the overall process, I decided this was the right moment to close the cycle and prepare for harvest.
Many growers perform a root flush at this stage, while others don’t. In my case, I chose not to flush —and the final flavor turned out excellent.
🌿 End of Cycle & Harvest

- Cut the stem.
- Trim the leaves.
- Hang to dry in a dark, cool, ventilated space.
🌟 Final Result & Wrap-Up

🌼 Yield: 18g of resinous flower.. Beyond the harvest, this experiment proved that curiosity and consistency can bring great results. With nothing more than a small hydroponic kit, an autoflower seed, and the patience to learn along the way, it was possible to grow resinous, good-quality flowers… (which can no doubt be improved even further).
You don’t need a grow tent, expensive equipment, or a professional setup to get started — the only real requirement is the willingness to try and adapt.
If there’s one takeaway from this experience, it’s this: 🌿 don’t let limited space or budget hold you back. With curiosity and care, even the simplest system can turn into a truly rewarding journey.
🔄 What I’d Change Next Time
- I’d start feeding a bit earlier to avoid those early nutrient deficiencies.
- I might skip the root cut and let the plant grow naturally — just to compare results.
- I’d be more aggressive with pest prevention around week 6–7
👉 Thinking of trying it yourself? Grab a hydro kit, a strong auto, and get growing.
👉 Full timelapse above — and follow me for the upcoming 12-plant (from seed) challenge.


| 🌱 Don’t miss the next timelapse Leave your email and be the first to get notified when we release the new full grow log. |
Leave a Reply